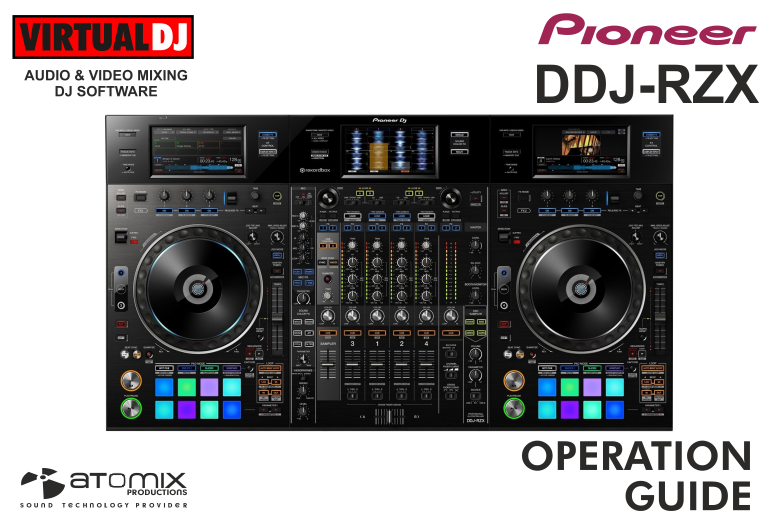
PIONEER DDJ-RZX
INSTALLATION
Firmware & Drivers
Firmware: Update the firmware of the unit to the latest version from https://www.pioneerdj.com/en/support/software/archive/ddj-rzx/#firmware-update
Drivers: Install the latest drivers (for both Windows and MacOS X computers) from https://www.pioneerdj.com/en/support/software/archive/ddj-rzx/#drivers
VirtualDJ 2018 Setup
Download and install VirtualDJ from our Downloads Page (in case you have not done already)
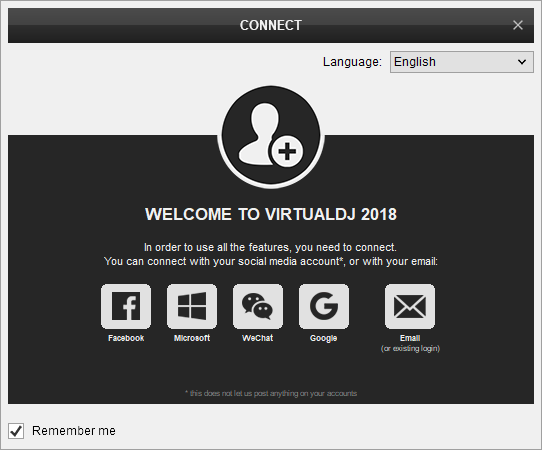
Once VirtualDJ is launched, a Login Window will appear. Please login with your preferred method from the ones provided.
A Pro Infinity or a Pro Subscription License is required to fully use the Pioneer DDJ-RZX.
Without any of the above Licenses, the controller will operate for 10 minutes each time you restart VirtualDJ.
Buy a license
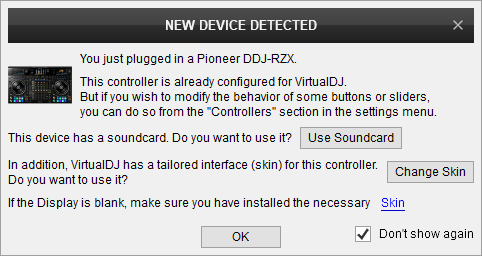
Click on the "Use Soundcard" button in order VirtualDJ to apply the pre-defined audio configuration. Keep in mind that due to the nature of the unit, speakers need to be connected to the Master Output of the DDJ-RZX and the pre-defined audio configuration has to be used.
Optionally, click on the "Change Skin" button in order VirtualDJ to load the 4 Decks default skin for it's GUI.
Finally, click on "Skin" text to download and install the necessary skin file required for the screens operation (see below)
Click to OK.
Screens Setup
Pioneer DDJ-RZX offers 3 touch screens that display various information, and allow you to manipulate various aspects of the software.
For the screens to work properly with VirtualDJ 2018 you need to install a special skin on your system.
Please visit THIS LINK to download the necessary skin.
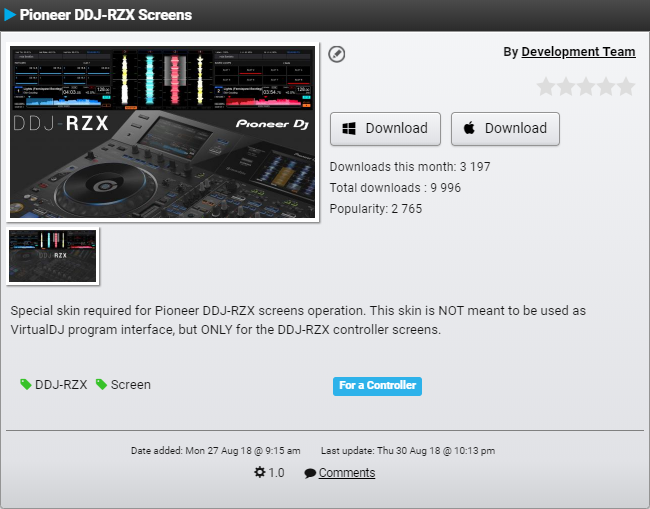
Click one of the download buttons according to your OS and save the file on your system. Once the file has been saved, double click the file to install the special skin on VirtualDJ 2018.
Advanced Setup
MIDI Operation
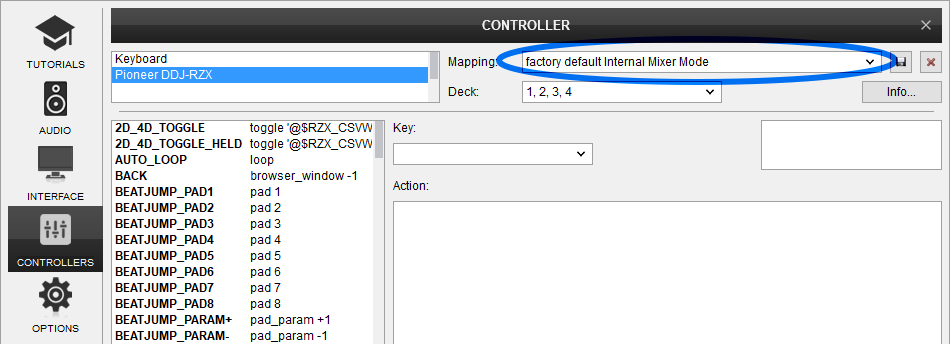
The unit should be visible in the CONTROLLERS tab of Config and the “factory default Internal Mixer Mode” available/selected from the Mappings drop-down list. The factory default Mapping offers the functions described in this Manual, however those can be adjusted to your needs via VDJ Script actions.
Find more details at VDJ Pedia
AUDIO Setup
The unit has a pre-defined Audio setup and a special button in the AUDIO tab of Config to provide that. Alternative Audio setups can be applied in the same window.
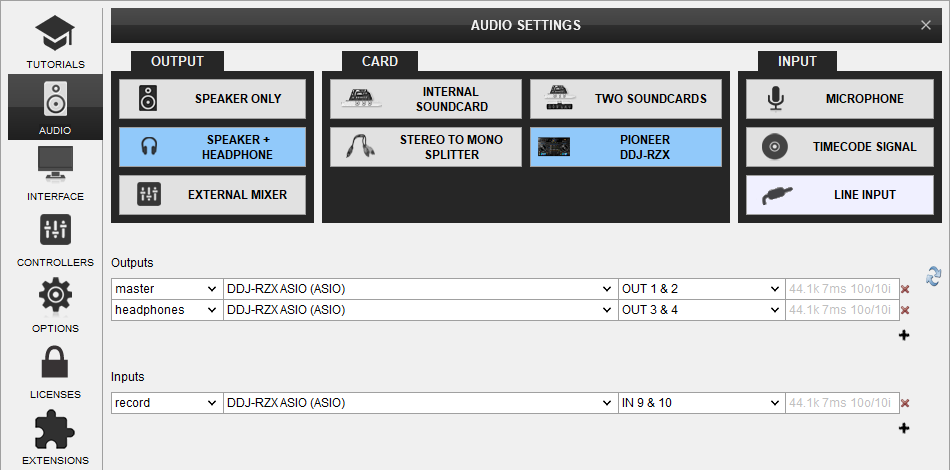
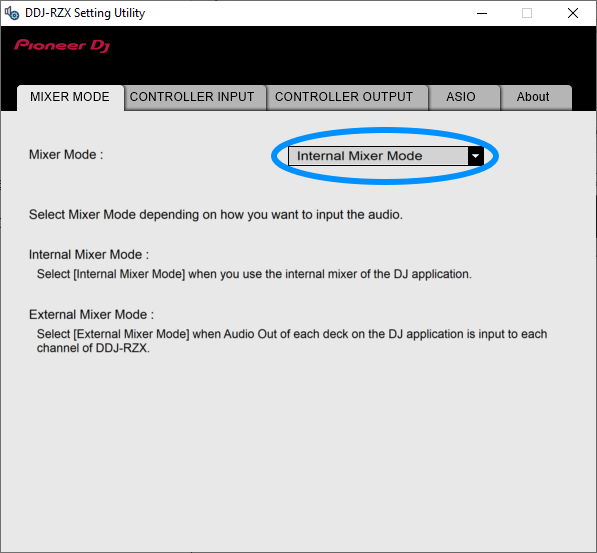
VirtualDJ uses the default audio routing provided by the device which is "Internal Mixer Mode". Please use Pioneer's "DDJ-RZX Setting Utility" application to make sure that the audio routing of the device is set to the correct mode prior operating this unit.
For further software settings please refer to the Manuals of VirtualDJ .
LAYOUT
S SHIFT: Hold this button down to access secondary functions of Pioneer DDJ-RZX (mainly in black lettering inside a gray box)
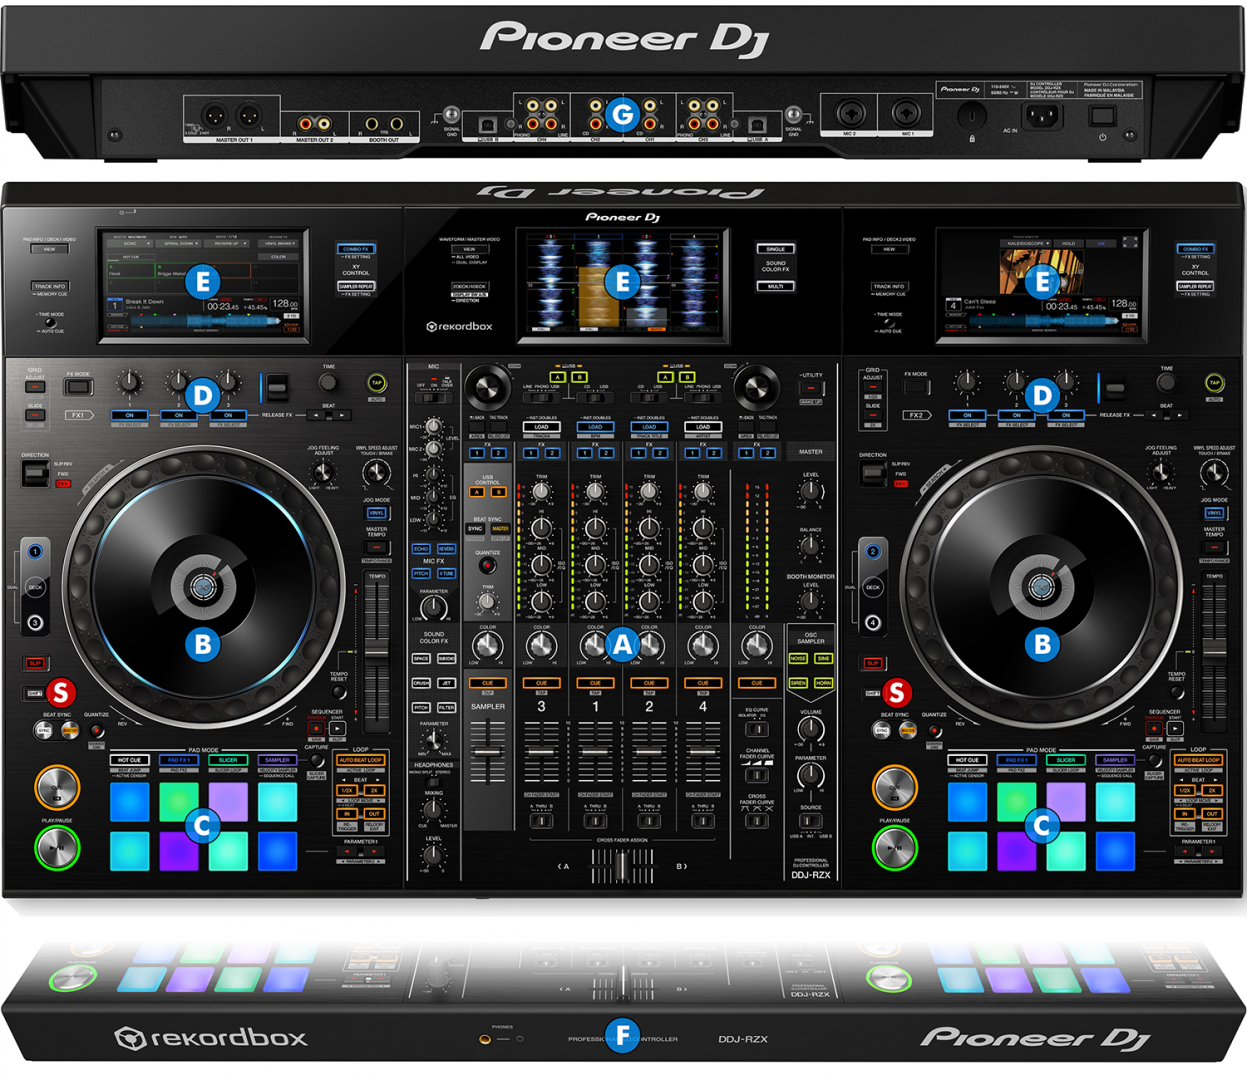
The functionality of each button, knob and slider per section (as shown in the image above) will be explained in detail in the next chapters
Mixer & Browser Controls
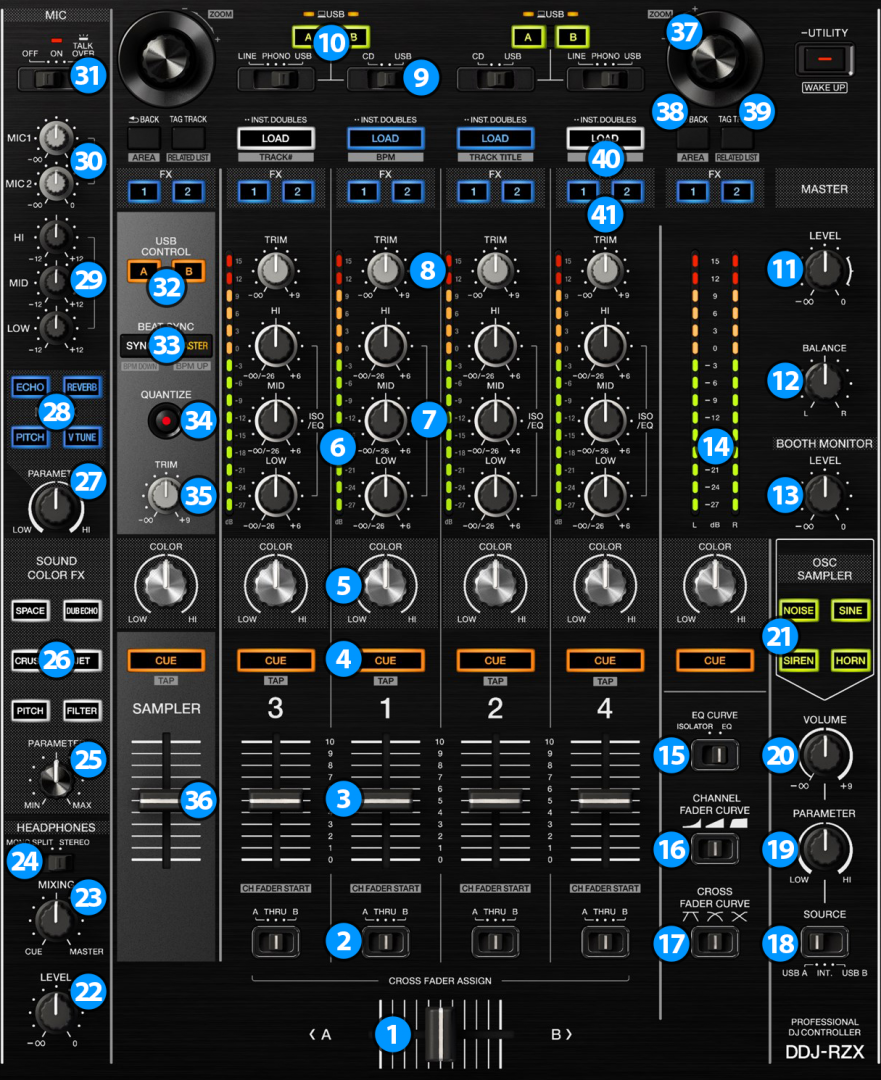
CHANNELS MIXING
- CROSSFADER. Blends audio between the channels assigned to the left and right side of the crossfader.
- CROSSFADER CH ASSIGN. Define if a mixer channel will be output regardless of the position of the crossfader (THRU position) or Left/Right.
- VOLUME. Adjust the Volume of each channel. While SHIFT is held down, the VOLUME faders will stop the deck at the previously selected Cue when these reach the minimum level (zero) and will start the deck (synced to the other deck) if those move from the zero position. (Fader Start)
- CUE (PFL) (per channel) Press these buttons to send each channel to the Headphones Output channel. Please note that in order to hear the Master Output on your headphones you must also turn the HEADPHONES MIXING (23) knob to the desired position (far right).
- COLOR FX PARAMETER. Adjust the parameter of the selected COLOR FX for each channel. When in middle position, the COLOR FX has no effect on the sound. Use the SOUND COLOR FX (26) buttons to select a COLOR FX.
- CH INPUT VUMETER. Shows each channels input (pre fader) volume.
- HIGH/MID/LOW (EQ). Adjust the High, Mid and Low frequencies for each mixer channel.
- TRIM. Adjust the Gain of each mixer channel. Note that the "zero gain / park" position is 12 o clock.
- INPUT SELECTORS. Define the source of each Channel. Put the switchers to USB position for software mixing.
- USB. Define if the Left or Right channels of the DDJ-RZX mixer will control the computer connected to the USB A port or the computer to USB B port. Use these buttons to do seamless transitions between 2 dj's with different computers connected on DDJ-RZX USB ports.
MASTER SECTION & PARAMETERS
- MASTER VOLUME. Adjust the level of the Master Output. Hardware operation but movement visible on the VirtualDJ GUI
- MASTER BALANCE. Adjust the balance of the Master Output level between left and right channel.
- BOOTH MONITOR. Adjust the level of the Booth Output of the DDJ-RZ. Hardware operation, not visible on the VirtualDJ GUI.
- MASTER OUTPUT VUMETER. Shows the master output volume of the unit. Hardware operation.
- EQ MODE. Set the desired equalizer mode between typical operation (EQ) and full kill (ISOLATOR)
- CHANNEL FADER CURVE. Set the desired channel fader curve to one of the three available options (logarithmic, linear, quadratic)
- CROSSFADER CURVE. Set the desired crossfader curve to one of the three available options (Scratch, Smooth, Full)
OSCILATOR
- OSC SOURCE. Select whether the OSCILLATOR SAMPLER section of DDJ-RZX will work in internal / hardware / stand alone mode (INT position) or if it will send out MIDI commands on the computer connected on one of each two USB ports. Please note that when the switch is set to USB A/B the internal OSCILLATOR does not function any more, and that VirtualDj does not have any commands assigned on this section allowing you to use it for your own remapping needs.
- OSC PARAMETER. Adjusts the parameter of the sounds produced by the OSC Sampler. For "Noise" and "Sine" it adjusts Echo & LFO parameter, while for "Siren" and "Horn" it adjusts an Echo parameter only.
- OSC VOLUME. Adjusts the volume of the OSC Sampler
- OSC SAMPLES. Trigger momentarily (while pressed) the OSC generator of DDJ-RZX. The available samples are Noise, Sine, Siren & Horn
HEADPHONES CONTROL
- HEADPHONES VOLUME. Adjust the volume of the Headphones Channel. Hardware operation, but movement visible on the VirtualDJ GUI.
- HEADPHONES MIXING. Adjust how the Channels and the Master Output blend at the Headphones Channel. Hardware operation, but movement visible on the VirtualDJ GUI. Please note that in order to hear the MASTER channel's output, it's CUE (PFL) button must be also engaged.
- HEADPHONES SPLIT. Select whether you want to hear a stereo mix on your headphones (STEREO) or a monaural split where channel's output is assigned on left headphone and master channel's output is assigned on right headphone (MONO SPLIT)
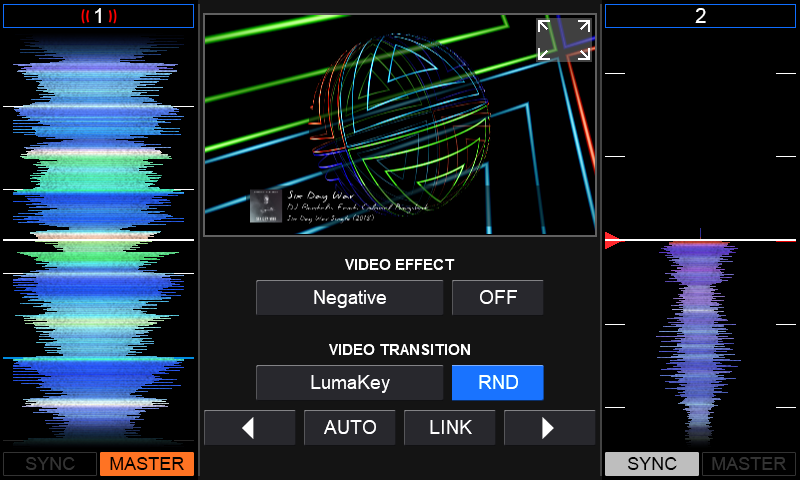
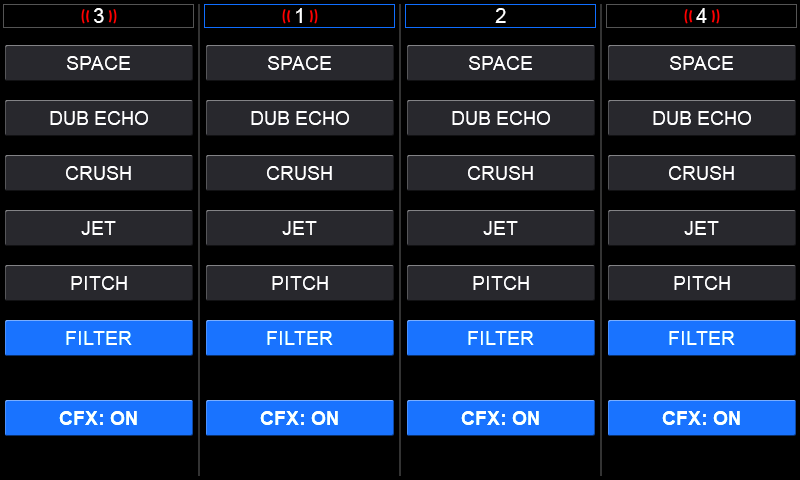
COLOR FX
- SOUND COLOR FX PARAMETER. This knob is not used by VirtualDj.
- SOUND COLOR FX. Select one of the predefined Color Effects (Space, Dub Echo, Crush, Jet, Pitch and Filter) that you can use in combination with COLOR FX PARAMETER (5) knob in order to apply effects that colorize the sound on each of the DDJ-RZX channels
MICROPHONES CONTROL
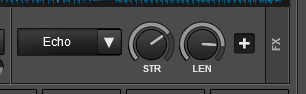
- MIC FX PARAMETER. Adjust the parameter of the effects applied on the microphones connected on DDJ-RZX.
- MIC FX. Select to apply one of the 4 available effects (Echo, Reverb, Pitch & V.Tune) on the microphones sound output. These effects are hardware and their buttons cannot be used on VirtualDJ for any operation.
- MIC EQ. Adjust the HIGH, MID and LOW frequencies of MIC1 and MIC2 Inputs of the DDJ-RZX (Hardware operation)
- MIC VOLUME. Adjust the Volume Level of MIC1 and MIC2 Inputs of the DDJ-RZX (Hardware operation)
- MIC CONTROL. Turn ON and OFF the MIC1 and MIC2 Inputs of the DDJ-RZX or enable the auto Talk Over function. (Hardware operation)
SAMPLER CONTROL
- USB. Define if the Sampler Controls of the DDJ-RZX mixer will control the computer connected to the USB A port or the computer to USB B port.
- SAMPLER BEAT SYNC. These buttons are not used by VirtualDJ
- SAMPLER QUANTIZE. This button is not used by VirtuaDJ
- SAMPLER GAIN. This knob is not used by VirtualDJ
- SAMPLER VOLUME. Adjust the Master Output Volume of the VirtualDJ Sampler
BROWSER CONTROL
- BROWSE.
Turn: Scrolls through files or folders. Hold down SHIFT and turn this knob to adjust the zoom of the waveforms on VirtualDj GUI and Pioneer DDJ-RZX screens.
Push: Opens / Closes folders on tree view of VirtualDj browser. - BACK. Cycles focus between Folders list, Songs list and Sideview.
Hold down SHIFT and press this button to cycle though the available Sideview lists (Automix, Sidelist, Karaoke, Sampler and Clone). - TAG TRACK. Opens tag editor in order to edit track's information..
Hold down SHIFT and press this button to add the selected track on the Playlist (Automix) view. - LOAD. Press this button to load the selected track from the VirtualDJ Browser to a Deck. Fast double-press this button to load the other's deck track to the corresponding deck (clone).
Hold SHIFT down and then use the..
- Deck 3 LOAD button to sort the tracks of the Songs list by Track Number.
- Deck 1 LOAD button to sort tracks by BPM.
- Deck 2 LOAD button to sort tracks by Title.
- Deck 4 LOAD button to sort tracks by Artist.
OTHER
- FX ASSIGN. Copy applied effects from one deck to another. For more information see EFFECTS
Deck Controls
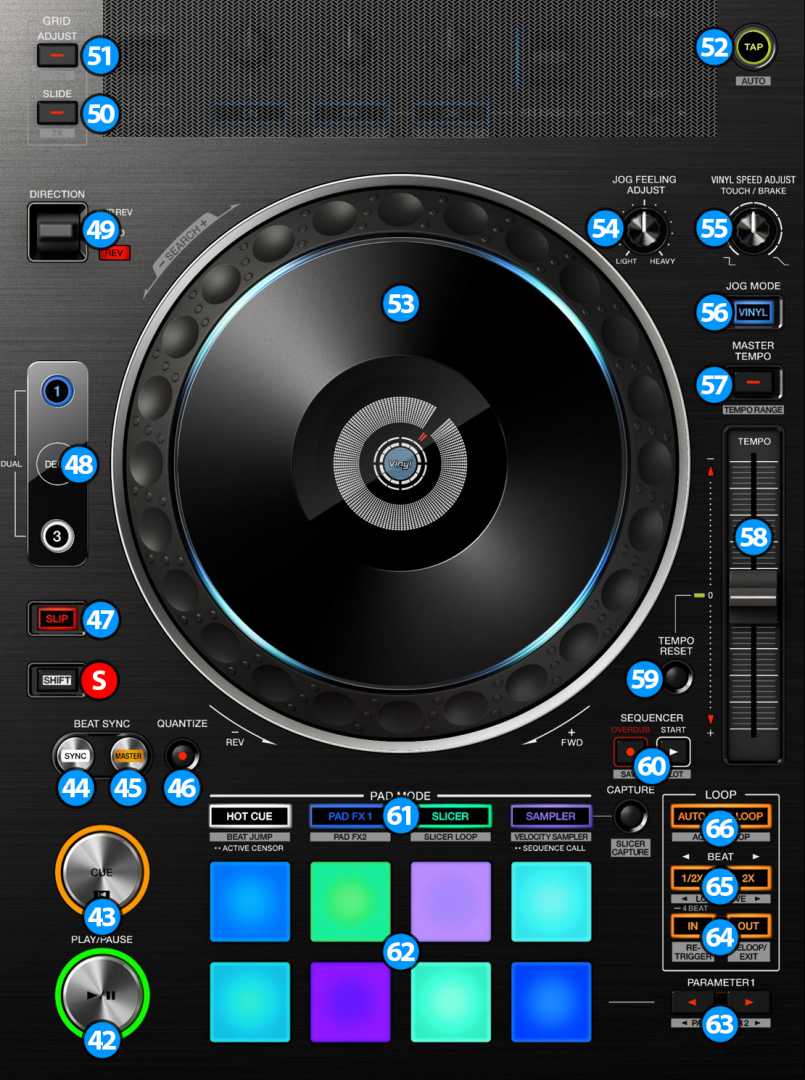
- PLAY/PAUSE. Plays / Pauses the track.
Press and hold SHIFT and then press this button to "stutter-play" the track from the last set Cue Point. - CUE. When the Deck is paused, you can set a temporary Cue Point by moving the Platter to place the Audio Pointer at the desired location and then pressing the Cue Button. During playback, you can press the Cue Button to return the track to this Cue Point. (If you did not set a Cue Point, then it will return to the beginning of the track.). If the Deck is paused, you can press and hold the Cue Button to play the track from the Temporary Cue Point. Releasing the Cue Button will return the track to the temporary Cue Point and pause it. To continue playback without returning to the Temporary Cue Point, press and hold the Cue Button, then press and hold the Play Button, and then release both buttons.
Hold down SHIFT and then press this button to return to the beginning of the track. - SYNC. Press this button to automatically match the corresponding Deck's tempo with the opposite Deck's (or the Master Deck’s if using a 4 decks Skin) tempo and phase.
Hold down SHIFT and press this button to reset gradually this deck's tempo back to 0. - MASTER. Set manually this deck as "Master" deck. All other decks automatic functions will follow this deck.
Hold down SHIFT and press this button to set Master deck selection back to automatic. - QUANTIZE. Press this button to toggle Quantize on/off. When Quantize is enabled, setting loops, jumping between hot cue points and starting playback of the deck will snap to the grid (CBG) of the track.
- S SHIFT. Press and hold this button to access secondary functions (black lettering in gray box) of other controls on the DDJ-RZX
- SLIP. Enables Slip Mode. Several software functions (such as Jogwheel movements, HotCues and Loops) will apply temporary on the track, and the track will return to the position it would have been if those functions were not triggered.
- DECK SELECT. Switch Left decks (1 and 3) and Right Decks (2 and 4).
- SLIP REVERSE / REVERSE. Push this lever upwards and hold it in place in order to play the track backwards. On release the track will continue from the position it would have been if the lever was never used. Drag this lever downward to play the track backwards. Restore the lever back to middle position in order to return to forward direction.
- GRID SLIDE. Hold down this button and then move the JOGWHEEL to shift the position of the CBG of the track.
Hold down SHIFT and press this button to double the BPM of the current track. - GRID ADJUST. Hold down this button and then move the JOGWHEEL to adjust the width of the CBG of the track (equal to adjusting the BPM of the track).
Hold down SHIFT and press this button to halve the BPM of the current track. - TAP. TAP this button a few times in order to set new BPM manually for the song loaded on deck (in case automatic detection was wrong).
Hold down SHIFT and press this button in order to reanalyze the song for BPM and cancel any changes you made. - JOGWHEEL. Pressure sensitive platter for scratching (vinyl mode), bending (CD Mode) or Grid adjust.
The outer blue/white leds will start blinking if the track reaches 30 seconds before the end.
The inner white leds will rotate according to the software jogwheel position.
The inner red ring indicates the loop's progress bar if a loop is active, or current hotcue's position on the jogwheel rotation. If Slip Mode is active, among with the current hotcue's position, the red leds will also show you the slipping rotation of the jog. - JOG FEELING ADJUST. Adjust the tension of the jogwheel (hardware operation)
- VINYL SPEED ADJUST. Adjust the time needed for the track to reach to full stop when PLAY/PAUSE (42) button is used to stop the deck (vinyl brake)
- JOG MODE. Press this button to toggle the JOGWHEEL (53) between the Scratch and Bend jogwheel modes.
- MASTER TEMPO. Press this button to "lock" the track's pitch to its original key. The track's tempo will remain at the speed designated by the Pitch Fader.
Hold down SHIFT and press this button to cycle through the available pitch ranges (6%, 10%, 12% and 100%) - TEMPO. Controls the track's playback tempo. The Up and Down arrow LEDs will turn on if the tempo position of the unit and the actual tempo of the software do not match. While one of these LEDs is on, the tempo slider of the DDJ-RZX will not control the tempo of the deck until it meets the software value (soft take-over). Move the unit's tempo slider towards the direction of the LED that's turned on until it turns off. Now you can use the unit's tempo slider to adjust the tempo of the software.
- TEMPO RESET. Press this button to restore the track's tempo immediately back to 0
- SEQUENCER. These buttons are not used by VirtualDj
- PAD MODE. Switch the pads of the unit to various modes (see PERFORMANCE PADS)
- PERFORMANCE PADS. Offer various operations, depending on the PADs Mode (see PERFORMANCE PADS)
- PARAMETERS. Offer various operations, depending on the PADs Mode (see PERFORMANCE PADS)
- LOOP IN/OUT. Use these buttons to set a Loop In and a Loop Out point (for manual looping).
Hold down SHIFT and press the "IN" button to jump back to the last "Loop In" point.
Hold down SHIFT and press the "OUT" button to cancel and exit the current loop -if the track is in loop- or reactivate the last used loop otherwise. - LOOP HALF/DOUBLE. Halves/Doubles the size of the current active loop, or the predefined loop length used by AUTO BEAT LOOP (66) button.
Hold down SHIFT and press these buttons when a loop is active to move the loop forward or backwards as many beats as it's current length. - AUTO BEAT LOOP. Sets an Automatic loop where it's length equals the current loop length as seen in VirtualDj GUI. You can use the LOOP HALF/DOUBLE (65) buttons to adjust the length of the auto loop.
Hold down SHIFT and press this button to activate a Saved Loop.
PERFORMANCE PADS
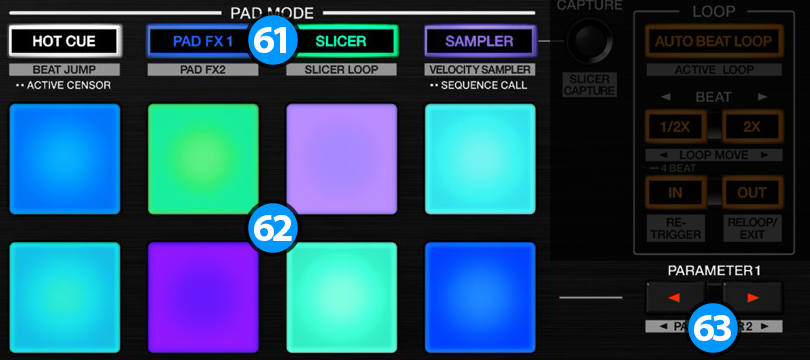
- PAD MODE. Press any of the 4 available Pad mode buttons to set the Pads to Hotcues, Pad FX1, Slicer and Sampler mode.
Hold SHIFT and then press any of the 4 available Pad mode buttons to set the Pads to Beatjump, Pad FX2, Beat Loop and Velocity Sampler mode. - PERFORMANCE PADS. The 8 Pads offer different functionality depending on the selected mode.
- PARAMETERS. These buttons control the Parameters of the selected Pad mode.
The Parameters of each mode can be adjusted from the VirtualDJ GUI (Pads section)
Read further details about Pads in the VirtualDJ 8 manual
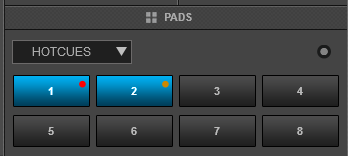
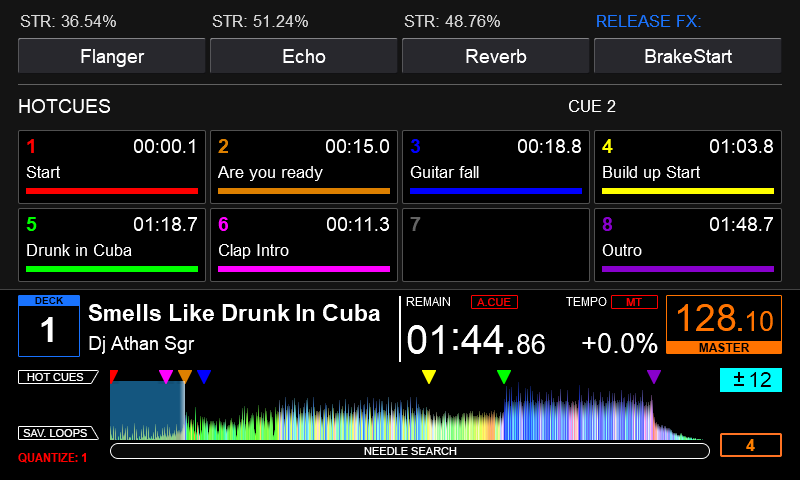
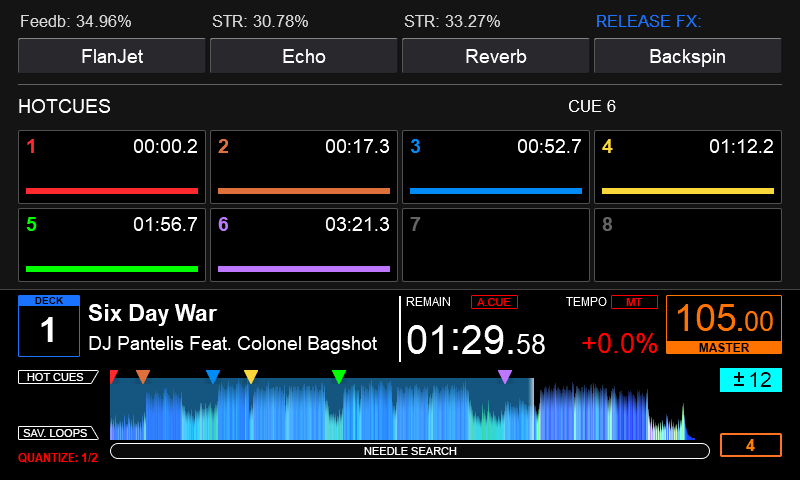
HOT CUE
Each one of the 8 pad assigns a Hot Cue Point (1 to 8) or jumps the track to that Hot Cue Point (if assigned).
When a Hot Cue Button is unlit, you can assign a Hot Cue Point by pressing it at the desired point in your track. Once it is assigned, the Hot Cue Button will light on.
Hold SHIFT and then press a pad to delete its assigned Hot Cue Point.
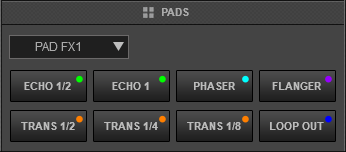
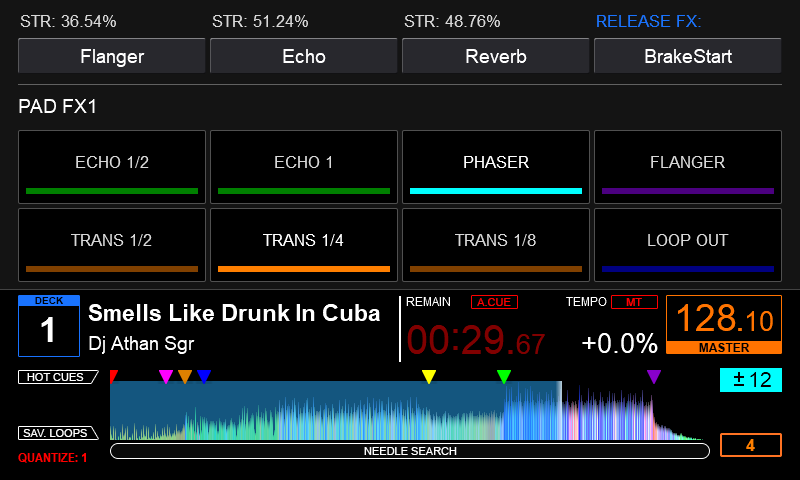
PAD FX1
Each one of the 8 pad triggers a pre-defined Effect as per the image on the side.
Pads 1-2 : Trigger the Echo Effect of 1/2 and 1 beats size respectively.
Pad 3: Triggers the Phaser Effect at 8 beats Speed.
Pad 4: Triggers the Flanger Effect at 8 beats Speed.
Pads 5-7: Trigger the Cut Effect of 1/2, 1/4 and 1/8 beats size respectively.
Pad 8: Triggers the Loop Out effect.
SLICER
The 8 pads represent eight sequential beats—"Slices"—in the Beat Grid. The currently playing Slice is represented by the currently green lit pad. The light will move through the pads as it progresses through each eight-Slice phrase. Press a pad to repeat that Slice (hold it down if you want to keep looping it).
Once the Pad is released the track will continue to play from the position it would have been if the pad was never pressed.
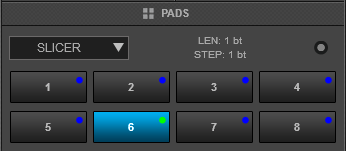
Hold SHIFT and then use the Pads to repeat the memorized Slices (the Slices played/repeated last time)
Use the PARAMETER buttons to adjust the length of the Loop applied to the slice. or adjust the step of the Slices
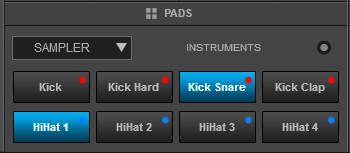
SAMPLER
Each one of the 8 pads triggers a sample from the selected Sampler Bank of VirtualDJ. If a bank has less than 9 samples, both sides of the DDJ-RZX will control the same samples. If a bank has more than 8 samples, the left side of the DDJ-RZX will control samples 1 to 8 and the right side samples 9 to 16.
Press the pads to trigger a sample. Depending on the selected trigger Pad mode, use SHIFT and the same pads to stop the sample.
Use the PARAMETER buttons to select the Sampler Bank (previous/next).
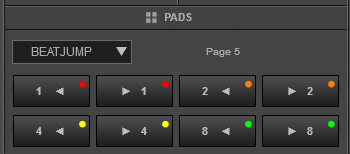
BEAT JUMP
In this mode, each one of the Pads will jump the track backwards/forward by the amount of beats depending on the selected page/bank (from 1/8 beats to 32 bars)
Use the PARAMETERS buttons to select the previous/next page with the desired Beats sizes
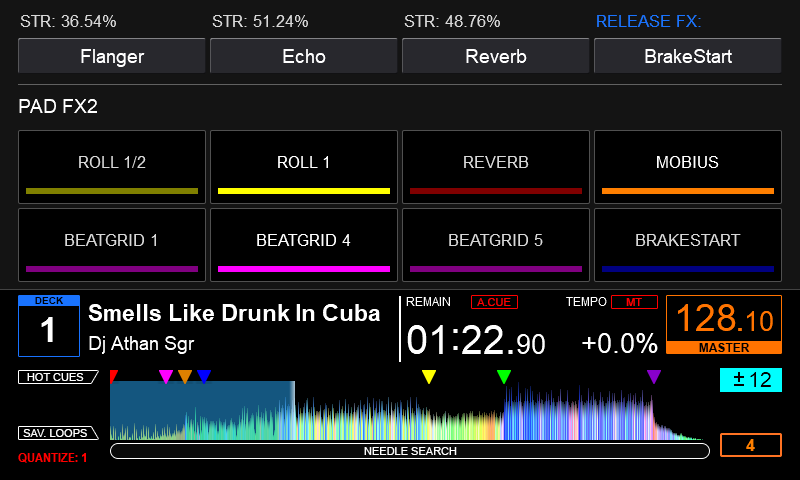
PAD FX2
Each one of the 8 pad triggers a pre-defined Effect as per the image on the side.
Pads 1-2 : Trigger the Loop Roll Effect of 1/2 and 1 beats size respectively.
Pad 3: Triggers the Reverb Effect.
Pad 4: Triggers the Mobius Effect.
Pads 5-7: Trigger the 1st, 4th and 5th bank of Beat Grid Effect respectively.
Pad 8: Triggers the BrakeStart Effect.

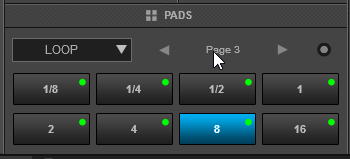
LOOP
Press one of the pads to trigger an Auto Loop of a different size in beats, depending on the selected page. There are 6 different pages available with sizes starting from 1/32 up to 128 beats.
Use the PARAMETER buttons to select the previous/next page with the desired Loop sizes
Hold SHIFT and then use the PARAMETER buttons to change the behavior of the Loop pads, by selecting the On/Off (toggle), Hold (momentary – while pad is pressed) or the Roll mode (track will resume to the position it would have been once the pad is released)
VELOCITY SAMPLER
Each one of the 8 pads triggers a sample from the selected Sampler Bank of VirtualDJ. If a bank has less than 9 samples, both sides of the DDJ-RZX will control the same samples. If a bank has more than 8 samples, the left side of the DDJ-RZX will control samples 1 to 8 and the right side samples 9 to 16.
Press the pads to trigger a sample. Depending on the pressure you apply on the pads the volume of the corresponding sample will adjust accordingly.
Use the PARAMETER buttons to select the Sampler Bank (previous/next).
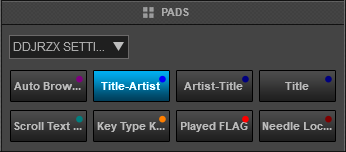
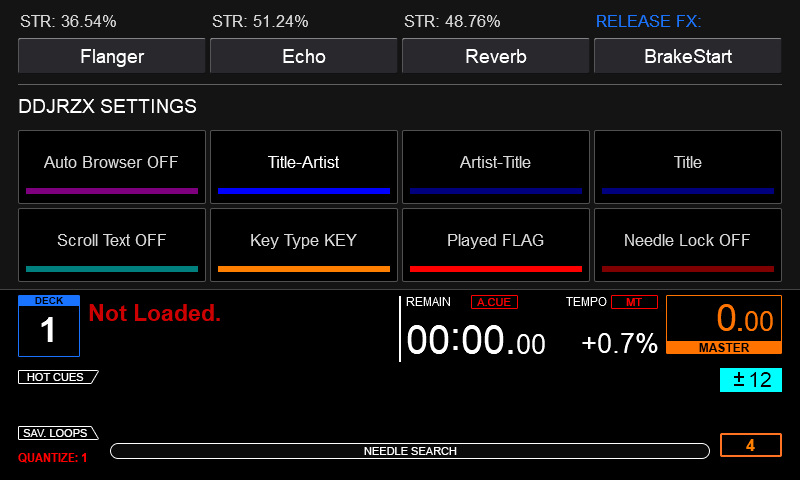
DDJRZX SETTINGS
Pioneer DDJ-RZX also offers a special pad page that's available only when the unit is connected and it allows you to adjust a few settings regarding it's screens operation.
Hold down HOT CUE mode button for more than 1 second to set the PADs to DDJRZX SETTINGS mode and automatically load the corresponding page in VirtualDJ GUI.
Each one of the 8 pad adjusts a setting as per the image on the side.
- Pad 1: Auto Browser (On/Off - Default is Off)
When enabled, the screen on the center of DDJ-RZX will show a browser when the browser is active. - Pads 2-4: Title - Artist, Artist - Title, Title (Default is Title - Artist)
Press one of these pads to set the desired format for the information displayed on the browser of DDJ-RZX central screen. - Pad 5: Scroll Text (On/Off - Default is Off)
When enabled the texts on all screens will scroll instead of being truncated when they don't fit on their designated space. - Pad 6: Key Type (Key/Camelot - Default is Key)
Select whether you want to see the key of the track as a musical key (e.g A) or as numeric -Camelot System- (e.g. 11B) - Pad 7: Track Color (Played Flag /Track Colors - Default is Played Flag)
Select the color of the files you wish to see on the browser of DDJ-RZX central screen. When set to Played Flag, tracks will appear with white text color and change to red if they have being played. When set to Track Colors the songs on DDJ-RZX screen browser will appear with their assigned color. - Pad 8: Needle Lock (On/Off - Default is Off)
When enabled, using the progress waveform on DDJ-RZX screens to seek through the track is prohibited if the track is audible.
PADS ON DDJ-RZX SCREENS
Depending on the selected view of Pioneer DDJ-RZX screens, all the pad pages will also show on deck screens.
Here are some examples of how some pad pages looks like on the DDJ-RZX deck screens:
EFFECTS
The Left FX unit (FX1) controls the effects of the Left selected software deck (1 or 3) and the Right FX unit (FX2) controls the effects of the Right selected software deck (2 or 4) respectively.
Use the FX ASSIGN (41) buttons to clone (copy) the Effects from one deck to another.
Each one of the FX unit offers 2 modes. The Single Effect mode that offers one effect slot but more parameters controls per effect, and the Multi Effects mode that offers 3 effect slots (to trigger more than 1 effect at the same time – chained effects).
The selection between those 2 modes is done by pressing the FX MODE (67) button.
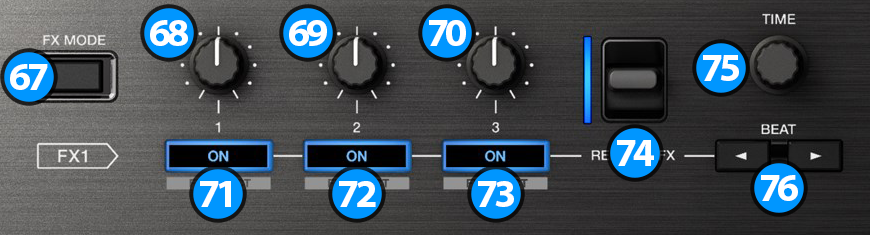
SINGLE EFFECT MODE
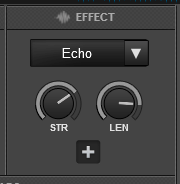
In this mode a single Effect is controlled with up to 6 Parameters and 4 Effect buttons. Only the first 2 Parameters are visible on the GUI. More Parameters and Effect buttons can be viewed in the FX GUI (opened from the + button on the GUI)
- FX1 knob. Controls the 1st effect parameter of the selected effect.
Hold down Shift and turn the knob to control the 4th effect parameter of the selected effect (if available). - FX2 knob. Controls the 2nd effect parameter of the selected effect (if available).
Hold down Shift and turn the knob to control the 5th effect parameter of the selected effect (if available). - FX3 knob. Controls the 3rd effect parameter of the selected effect (if available).
Hold down Shift and turn the knob to control the 6th effect parameter of the selected effect (if available). - FX1 ON. Enables/disables the selected effect.
Hold down Shift and press this button to select the next available effect. - FX2 ON. Enables/disables the 1st effect button of the selected effect (if available).
Hold down Shift and press this button to enable/disable the 3rd effect button of the selected effect (if available). - FX3 ON. Enables/disables the 2nd effect button of the selected effect (if available).
Hold down Shift and press this button to enable/disable the 4th effect button of the selected effect (if available).
MULTI EFFECTS MODE
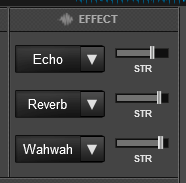
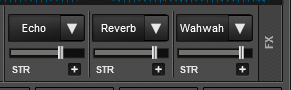
In this mode 3 different Effects can be applied and controlled with up to 2 Parameters for each FX slot. Only the first Parameter is visible on the GUI (and the 2nd Parameter while SHIFT is held on the DDJ-RZX). More Parameters and Effect buttons can be viewed in the FX GUI (opened from the + button on the GUI)
- FX1 knob. Controls the 1st effect parameter of the selected effect of slot 1.
Hold down Shift and turn the knob to control the 2nd effect parameter of the selected effect of slot 1 (if available). - FX2 knob. Controls the 1st effect parameter of the selected effect of slot 2.
Hold down Shift and turn the knob to control the 2nd effect parameter of the selected effect of slot 2 (if available). - FX3 knob. Controls the 1st effect parameter of the selected effect of slot 3.
Hold down Shift and turn the knob to control the 2nd effect parameter of the selected effect of slot 3 (if available). - FX1 ON. Enable/disable the selected effect of slot 1.
Hold down Shift and press this button to select the next available effect for slot 1. - FX2 ON. Enable/disable the selected effect of slot 2.
Hold down Shift and press this button to select the next available effect for slot 2. - FX3 ON. Enable/disable the selected effect of slot 3.
Hold down Shift and press this button to select the next available effect for slot 3.
RELEASE FX
- RELEASE FX LEVER. This lever offers two scales of engagement.
Push this lever downwards briefly to activate a release effect with short strength / duration.
Push this lever downwards all the way to the end to activate a release effect with maximum strength / duration.Release Effects are special effects that act on a slip fashion and stop the deck's playback.
The available Release Effects at the time this manual was written are Backspin, BrakeStart and Loop Out
OTHER FX KEYS
- EFFECT TIME. This encoder is not used by VirtualDJ
- EFFECT BEATS. Press these buttons to decrease or increase the value of the Beats length for the selected Effect (only for effects that offer this feature).
TOUCH SCREENS
Pioneer DDJ-RZX offers 3 touch screens that provide visual feedback and useful information about the tracks, while at the same time they can also be used in order to provide input to VirtualDJ.
DECK SCREENS
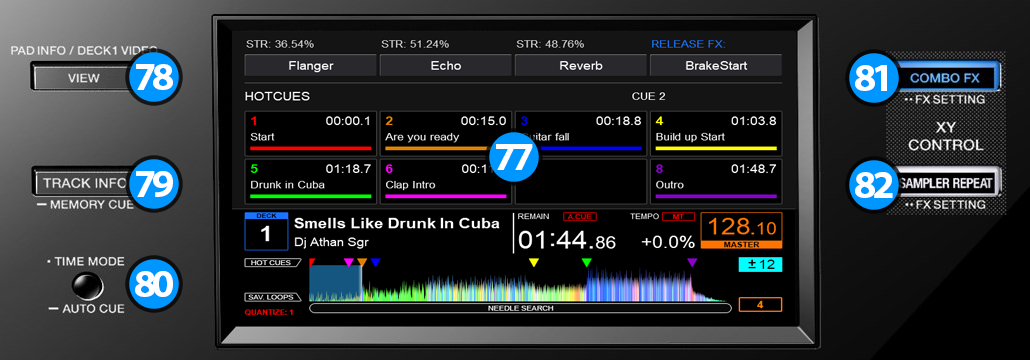
- TOUCHSCREEN. Displays various info about the current deck, and allows feedback to be provided back to VirtualDJ.
- VIEW. Switches the View of the current deck between Video preview and the rest modes. (Pads Information, Track Information and Scratch)
- TRACK INFO. Switches the View of the current deck between Pads information and Tracks information.
Hold down the button for 1 second to enable the Scratch view. - TIME MODE. Switches the display time mode between Elapsed and Remain times.
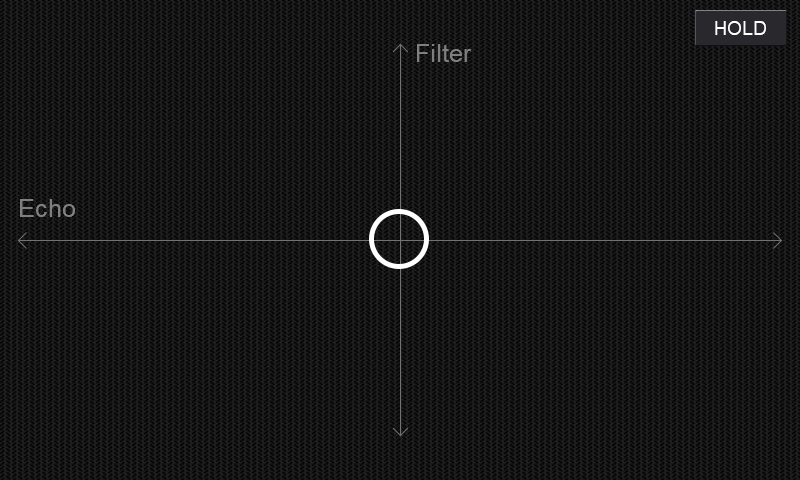
Hold down the button for 1 second to toggle Auto Cue mode on/off. - COMBO FX. Switches the View of the current deck in Combo FX Mode. In this mode you can use the touchscreen to apply two effects at once.
In this mode the X axis represents the effect in slot 1, and the Y axis represents the currently selected Color FX. - SAMPLER REPEAT. This button has no use in VirtualDJ. You can use it to map your own action(s).

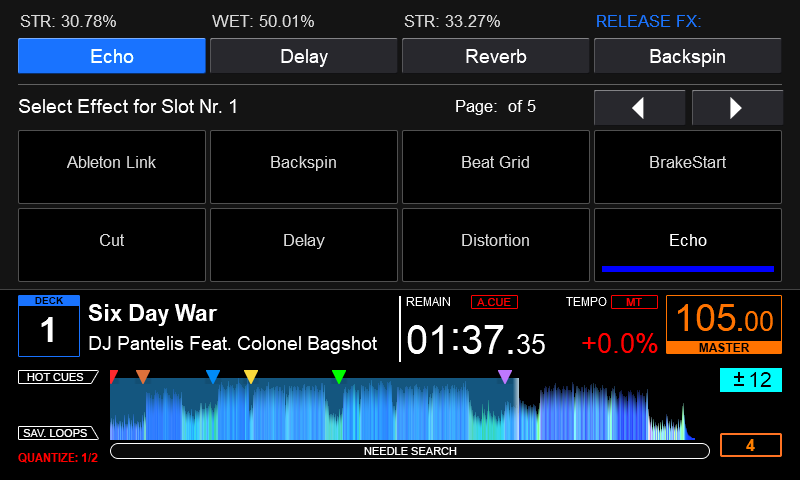
CENTRAL SCREEN
- TOUCHSCREEN. Displays various info about the mixer, and allows feedback to be provided back to VirtualDJ.
- VIEW. Switches central screen view between Video and the rest modes.
Hold this button down for 1 second to switch Central & Deck Screens to Video View at the same time.
Doubleckick this button to enable "Dual" Deck view on the Deck Screens.
Hold down SHIFT and press this button to show a permanent file browser on the central skin.
While permanent file browser is active, press the "SEARCH" soft button on DDJ-RZX display to bring up the On Display Keyboard to perform a search.
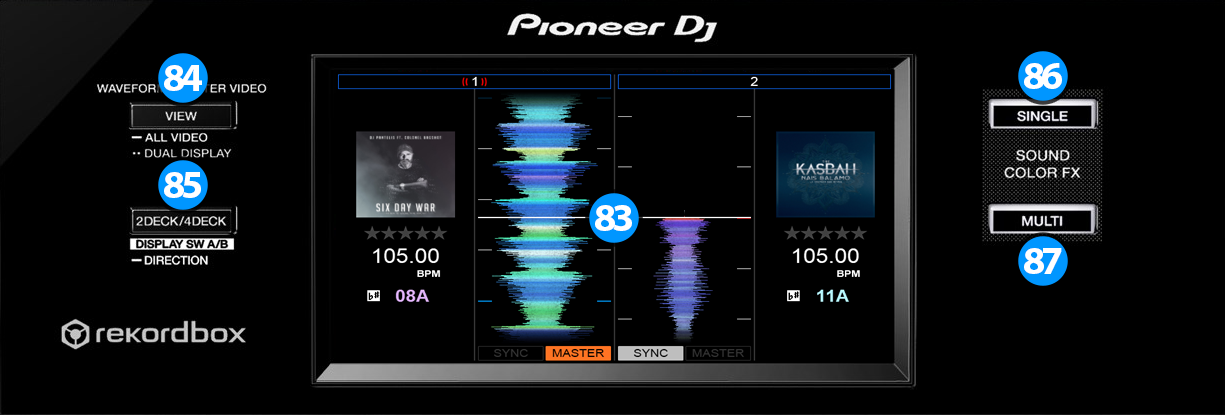
Hold down SHIFT and press this button again to close the file browser and return to previous view. - 2DECK / 4DECK. Toggle the Central Display between showing all 4 Decks, or 2 Decks mode (Left and Right selected deck). This option does not apply on Video View.
Hold this button down for 1 second to toggle the direction of scratch waveforms between Horizontal and Vertical. - SINGLE. Turns off Multi Color FX mode.
- MULTI. Turns on Multi Color FX mode. When Multi Color FX mode is active, each deck can have a different Color Effect assigned to it's Color FX PARAMETER knob (5). When Multi Color FX mode turns on for the first time, the Central Screen will present you a page to select one Color FX for each deck. You can close or open this page again by using the "MULTI" button in order to select different Color FX for one deck.
While Multi Color FX is active pressing a SOUND COLOR FX button (26) does not turn off Multi Color FX mode. Instead it simply assigns the same Color FX on all decks.
Advanced Audio Options
Pioneer DDJ-RZX offers a variety of Inputs and Operation modes. The unit can operate both as MIDI and a stand-alone hardware mixer at the same time, allowing mixing from analogue media sources (CD Players, Turntables etc) connected to one of the 4 available inputs at the rear panel, along with the ability to use a Computer DJ Application.
MIXER CHANNELS
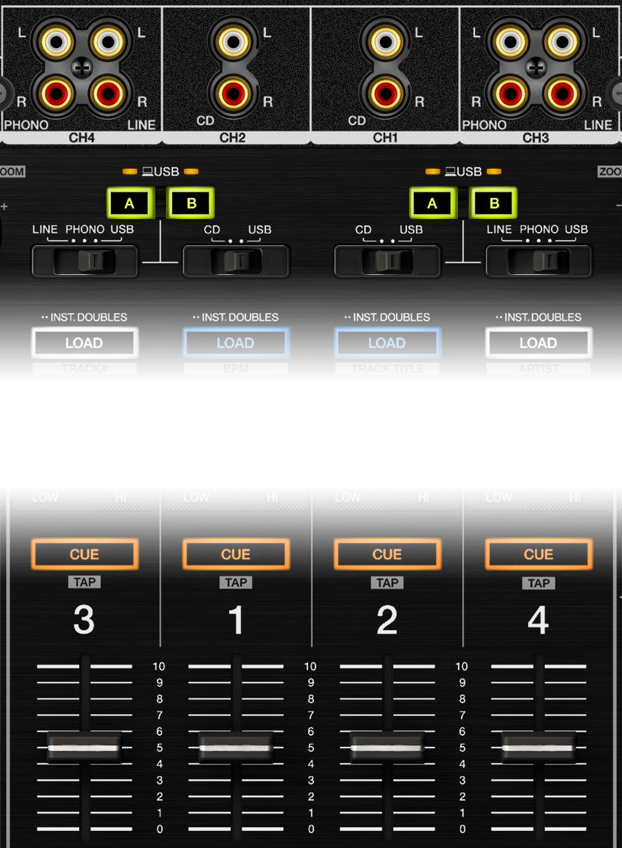
Audio signal from an analogue line level source (such as a standard CD Player) connected to the CH 3 LINE inputs at the rear panel can be inserted and processed by the mixer when the switcher at the top panel is set to Line position.
Audio signal from an analogue turntable source connected to the CH 3 PHONO inputs at the rear panel can be inserted and processed by the mixer when the switcher at the top panel is set to Phono position.
Audio signal from VirtualDJ Deck 3 can be routed to this Channel when the switcher at the top panel is set to USB position.
Channel 1 (middle-left) :
Audio signal from an analogue line level source (such as a standard CD Player) connected to the CH 1 CD inputs at the rear panel can be inserted and processed by the mixer when the switcher at the top panel is set to CD position.
Audio signal from VirtualDJ Deck 1 can be routed to this Channel when the switcher at the top panel is set to USB position.
Channel 2 (middle-right) :
Audio signal from an analogue line level source (such as a standard CD Player) connected to the CH 2 CD inputs at the rear panel can be inserted and processed by the mixer when the switcher at the top panel is set to CD position.
Audio signal from VirtualDJ Deck 2 can be routed to this Channel when the switcher at the top panel is set to USB position.
Channel 4 (far right) :
Audio signal from an analogue line level source (such as a standard CD Player) connected to the CH 4 LINE inputs at the rear panel can be inserted and processed by the mixer when the switcher at the top panel is set to Line position.
Audio signal from an analogue turntable source connected to the CH 4 PHONO inputs at the rear panel can be inserted and processed by the mixer when the switcher at the top panel is set to Phono position.
Audio signal from VirtualDJ Deck 4 can be routed to this Channel when the switcher at the top panel is set to USB position.
Notes :
- Each time a different source is selected from the top switchers, the audio signal of other sources on the same channel will be muted.
- Switch between various sources is smooth, providing the ability of back-to-back dj changeover.
- When the corresponding channels are set to USB position and there are two computers connected on the DDJ-RZX, the USB A/B buttons on the top of the mixer allow smooth transitions between different DJ's. When one of the USB A/B buttons is pressed for one of the sides of DDJ-RZX then both channels of that side are muted for the computer that has not the control anymore.
Internal VS. External Mixing when connected to a Computer DJ Application.
Pioneer DDJ-RZX offers two different modes of routing and mixing the audio when used by a Computer DJ Application such as VirtualDj.
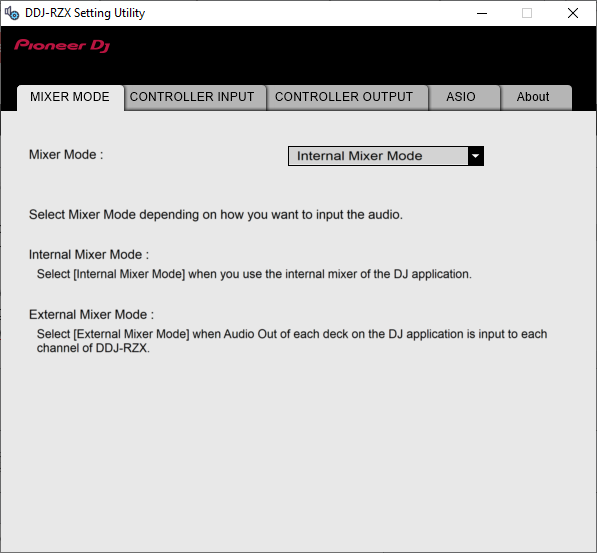
The default mixing mode is the "Internal Mixer Mode" where the sound is mixed by the DJ Application and routed directly on the Master Output Bus of the controller.
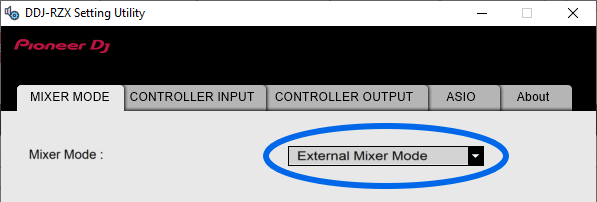
The other mode is "External Mixer Mode" where the sound of each deck on VirtualDj is routed on a separate Channel Bus of DDJ-RZX and the mixing of the audio is done by the hardware of the controller in a similar way of mixing analogue source signals.
To change the Mixer Mode of the device you need to use Pioneer's own "DDJ-RZX Setting Utility" application that get's installed on your system automatically along with it's drivers:

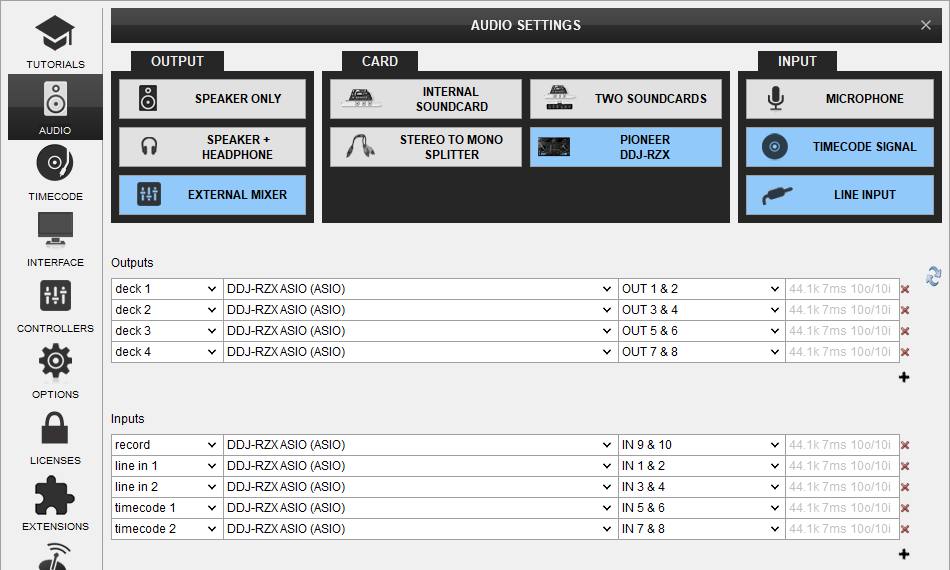
Using External Mixer Mode
In order to use External Mixer Mode with DDJ-RZX you need to perform 3 steps:
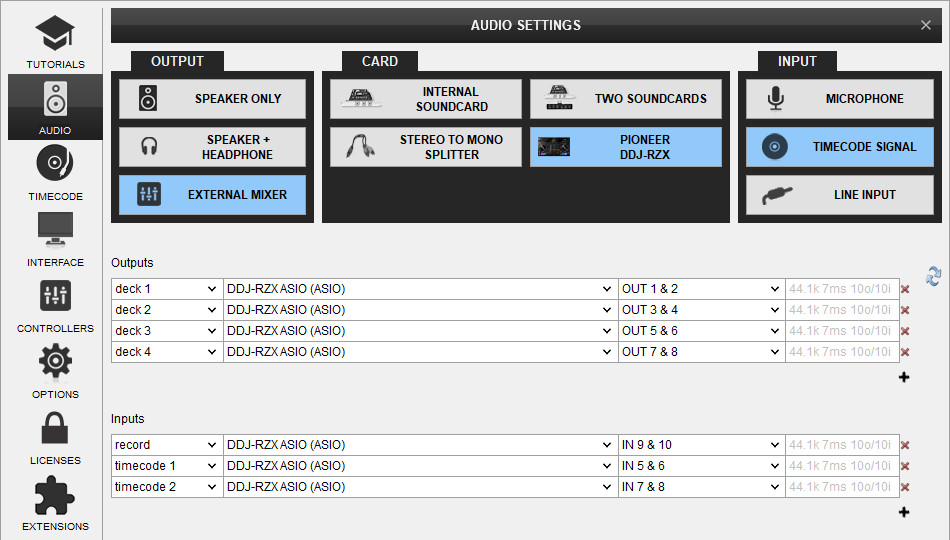
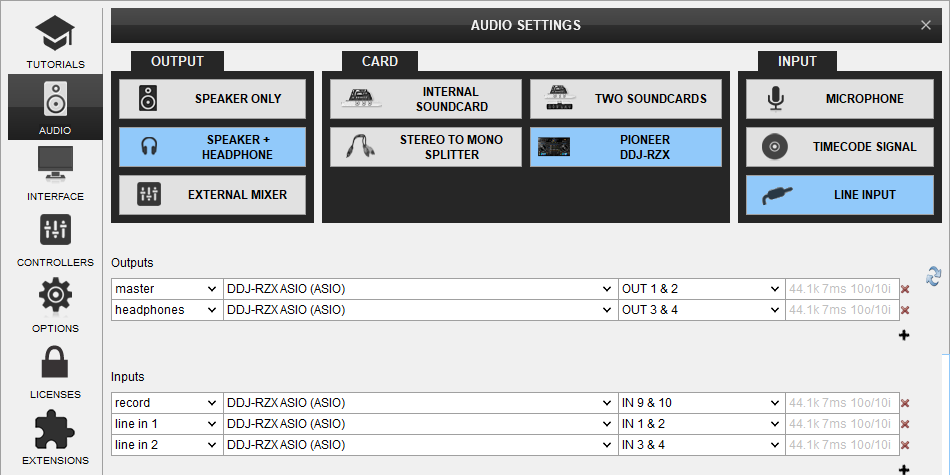
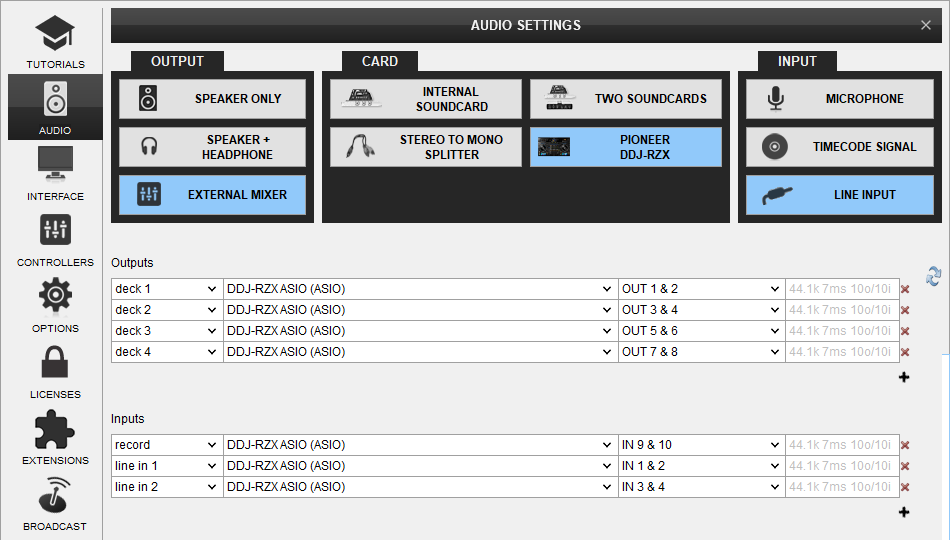
Set the unit to "External Mixer Mode on Pioneer's "DDJ-RZX Setting Utility"
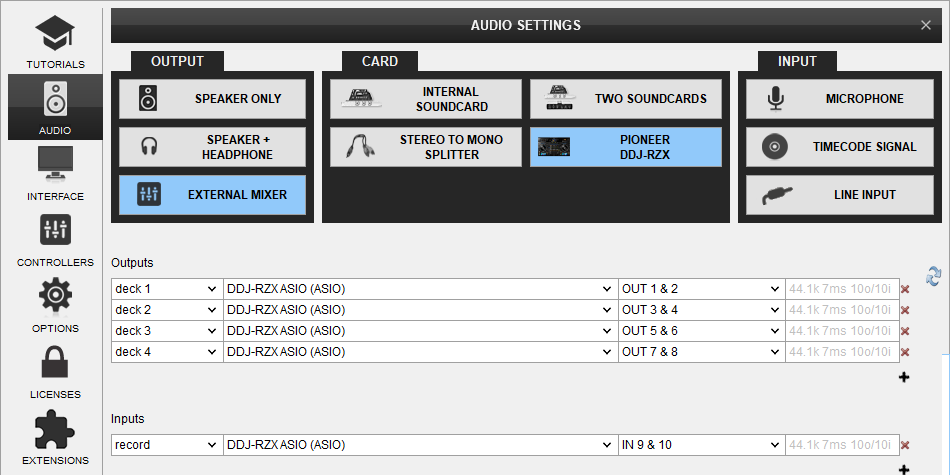
Create the following sound setup:
Select the alternative mapping for External Mixer Mode on Mappers tab:

Recording & Broadcasting
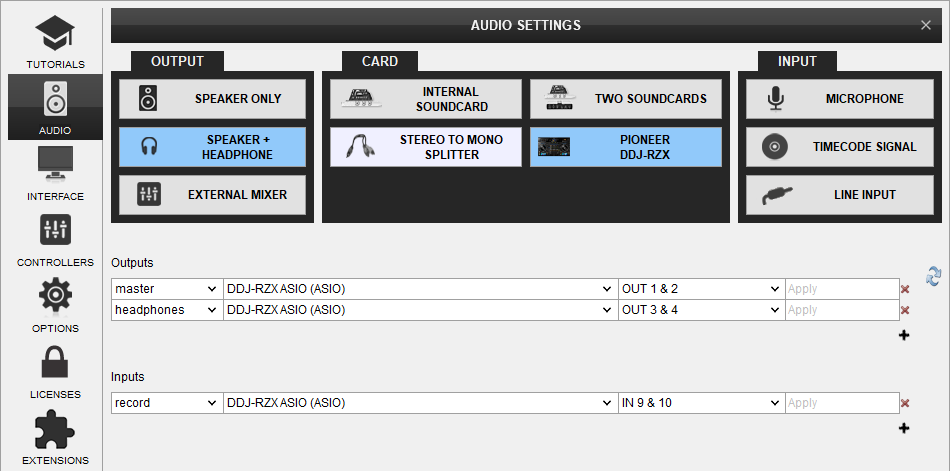
The unit offers the ability to record the Master Output along with the Microphone and LINE Inputs directly from VirtualDJ record button (in the MASTER center panel). The dedicated Recording input channel is already pre-configured, so no further adjustments need to be done.
The recorded output includes any source routed to the Mixer, including analogue media sources connected to the LINE or PHONO Inputs when the top switchers are set to the relative position.
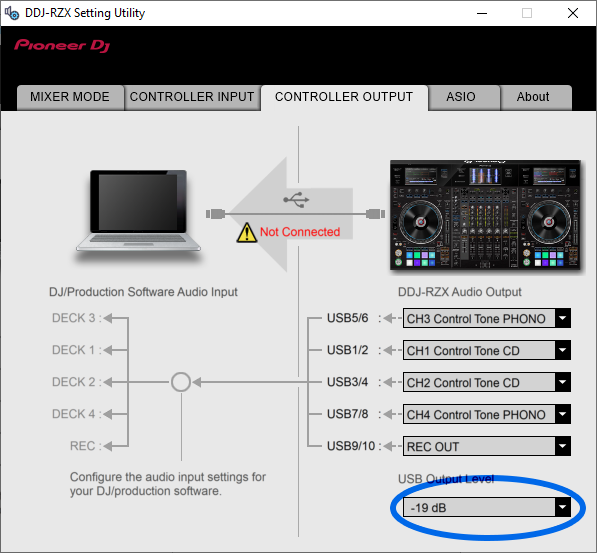
Since the audio to be recorded is coming from the USB sound interface of DDJ-RZX, the sound level of your recording will depend on the "USB Output Level" setting of DDJ-RZX Setting Utility. By default it's set to -19db, which is a value that provides enough headroom for mixing with all 4 channels combined with effects, e.t.c. We recommend to use the default value and use a post-processing software to boost the levels of your recordings if you need to do so.
Timecodes (DVS)
DDJ-RZX offers DVS (Timecoded CDs and Vinyls) Support.
Depending on whether you use Timecode Vinyl (Turntables) or Timecode CDs (CD Players) please perform the following steps:
- Connect your Turntables to LINE 3 and/or LINE 4. If you use CD Players connect them to LINE 1 and/or LINE 2 Inputs.
- Place the Input switches on the top panel to USB position for the related Mixer Channels
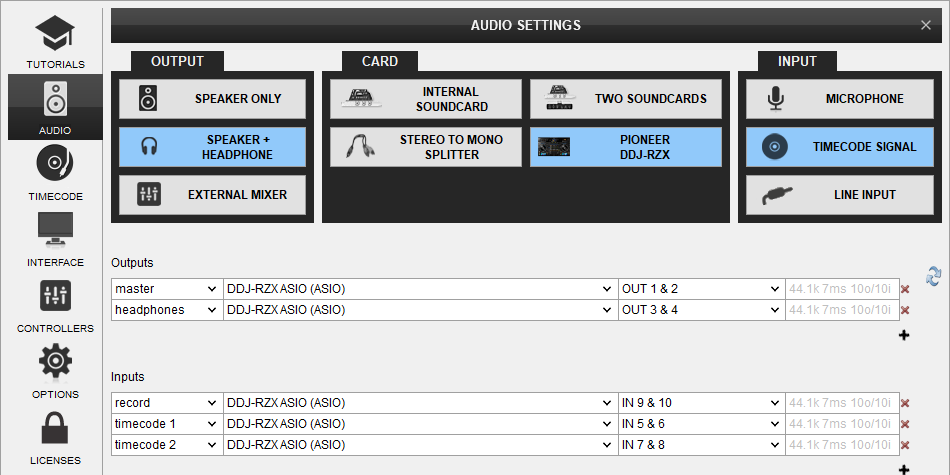
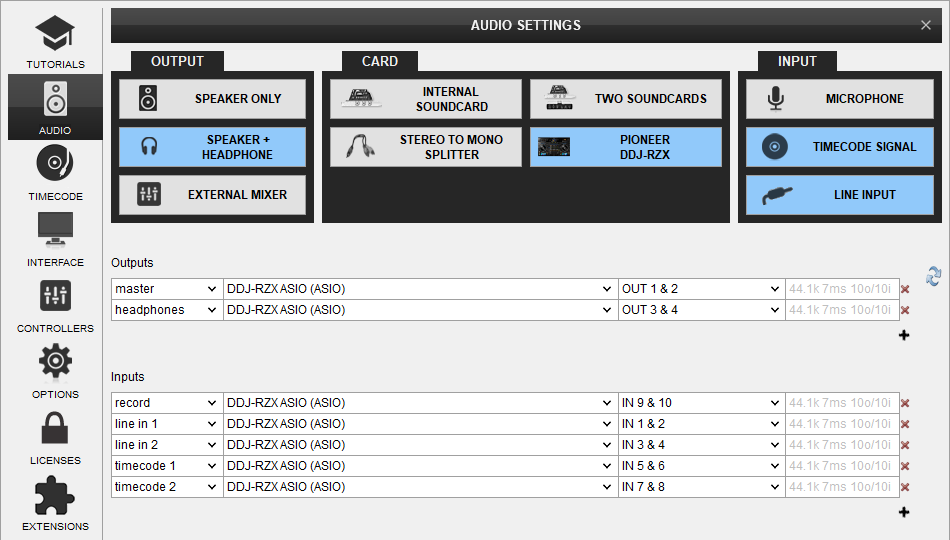
- Open VirtualDJ Settings ->AUDIO tab ans press the TIMECODE SIGNAL button from the INPUT tab
- Select the correct audio channels:
For Turntables use 5&6 for Channel 3 and 7&8 for Channel 4
For CD Players use 1&2 for Channel 1 and 3&4 for Channel 2 - Click to APPLY
Use the TIMECODE On/Off buttons that will be offered on the Decks (or in the SCRATCH panel for the 4 Decks default VirtualDJ GUI) to enable/disable Timecode control or use the Timecode signal to control a different Deck (e.g. swap Timecode control for Left decks when the 4 Decks GUI is selected)
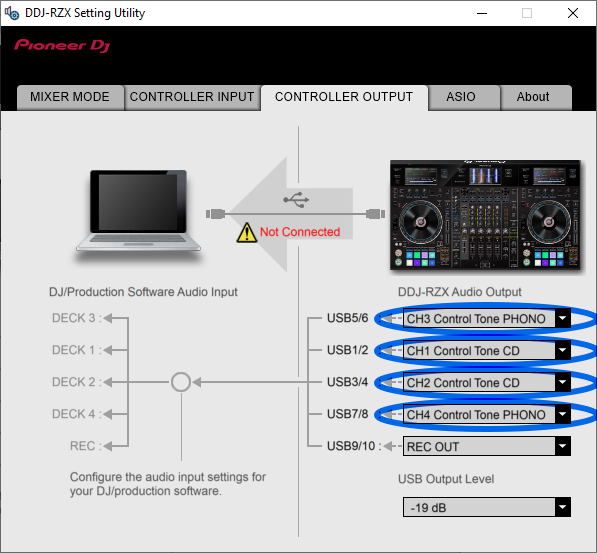
For Timecode CD's the unit also offers you the ability to connect them in Inputs 3 & 4 instead of turntables. In order to do so please open the "DDJ-RZ Setting Utility", click on the "CONTROLLER OUTPUT" tab and switch "USB5/6" Output from "CH3 Control Tone PHONO" to "CH3 Control Tone CD". Repeat the same procedure for "USB7/8" Output and change from "CH4 Control Tone PHONO" to "CH4 Control Tone CD"
LINE INS
The LINE Inputs 1 and 2 can be also used to send audio signal from an analogue media source connected at the rear panel to VirtualDJ for processing.
- Connect your analogue media devices to LINE 1 and/or LINE 2
- Place the Input switches on the top panel to USB position on Mixer Channels 1 and/or 2
- Open VirtualDJ Settings ->AUDIO tab and press the LINE INPUT button from the INPUT tab
- Click to APPLY
Use the LINE IN On/Off buttons that will be offered on the Decks (or in the SCRATCH panel for the 4 Decks default VirtualDJ GUI) to enable/disable Line In routing to a VirtualDJ deck.
This will provide the ability to synchronize BPM with other decks, use Effects etc.
TIMECODES & LINE INPUTS AT THE SAME TIME
It is possible to use both Timecodes and Line Inputs at the same time.
- Connect your analogue media devices to LINE 1, LINE 2, LINE 3 and LINE 4 Inputs as described on the chapters above.
- Place the Input switches on the top panel to USB position on all Mixer Channels
- Open VirtualDJ Settings ->AUDIO tab and press both LINE INPUT and TIMECODE SIGNAL buttons from the INPUT tab
- Click to APPLY
MICROPHONE INPUTS
DDJ-RZX offers 2 Microphone Inputs and Level/EQ controls from the top panel. Both audio signals from these inputs are directly routed to the Master Output of the unit.
The Microphone inputs are not part of the USB Audio interface, so these cannot be added in VirtualDJ Audio setup and will not control the software Microphone section in the MASTER panel of VirtualDJ GUI and vice versa.
However, as mentioned in the Recording section, both Microphone Inputs can be recorded via the REC button of VirtualDJ via the dedicated recording input channel of the Audio interface.
TROUBLESHOOTING - FAQ
TROUBLESHOOTING - FAQ
- Screens don't work. They only have a message saying "MIDI OPERATION"
[list] - Pioneer DDJ-RZX screens operate via a network connection that must be established between your computer and the controller.
Windows users: Please check your firewall and make sure that you allow incoming connections from both Private and Public networks for VirtualDJ
MAC users: Please open Settings->Network on your MAC and make sure that there's one active network connection that uses Pioneer DDJ-RZX as it's network interface. If not, create a new network connection on the same window and select Pioneer DDJ-RZX as network interface.
As of June 2019 a Windows Update in combination with the way Pioneer drivers work, have caused some computers to be unable to reproduce sound through DDJ-RZX USB Audio Bus even from Windows Sound Control Panel. In order to fix, please follow these steps:
If you still don't have any sound please contact support: http://www.virtualdj.com/help/
[/list]
